The Knitting Pattern Designer's Guide to Buttonholes
Good knitting pattern design is all about the details; making thoughtful choices about the function and aesthetics of your design without automatically choosing the default. And today, I’m jumping right into the details with this guide to designing handknits with buttonholes.
I want to preface this blog post by saying that I’ve learned almost everything that I know about buttonholes from Montse Stanley’s incredible Knitter's Handbook. I don’t think it’s in print anymore, but if you manage to find it for sale secondhand, I highly recommend that you snap it up! It is by far my favourite book about knitting techniques and something that I refer to often.
Before we start talking about buttonhole placement and technique, there are a few things you should know about designing with buttonholes.
Firstly, buttonholes should almost always be smaller than you think! Knitted edges tend to stretch and there is nothing more irritating than a baggy buttonhole. The buttons will just slip right out! Make a mini-swatch to test out your buttonhole in advance - the fit of the button should be snug but not tight.
Secondly, the weight of yarn that you’re using will influence the size of your buttons and therefore, the number of buttonholes that you need. Finer yarns should use smaller buttons and more buttonholes, whilst bulkier yarns should use larger buttons and fewer buttonholes. You could potentially break this “rule” by using larger buttons on a fine-knit cardigan, but using small buttons on a bulky cardigan will always look odd!
Finally, the direction of your buttonhole changes where you place it. A traditional buttonhole is usually vertical because the button band is picked up along the edge of the front panels of a cardigan.
However, in some cases, your buttonhole might be horizontal instead. This happens when you’re knitting the button band into the main body of the cardigan, rather than picking it up, or when you’re adding a buttonhole to the neckband of a round-neck cardigan.
When the buttonhole is horizontal, the button will not sit directly in the centre of it when buttoned. It will naturally pull towards the outer edge, even in more oversized garments. This is why horizontal buttonholes should be offset away from the edge, so that when the cardigan is buttoned, the button bands will be aligned neatly on top of one another.
How to Place Knitted Buttonholes
Your buttonholes should not be placed too close to the edges or else they will look messy or even, strange. They should sit at least three stitches away from the bottom or top edge of the button band to avoid a messy finish.
The top buttonhole is placed differently, depending on the type of neckline you are designing. In a V-neck cardigan, I like to place the top buttonhole right at the point when the V-neck shaping transitions to the straight edge of the centre front.
In a round neck cardigan, the top buttonhole should be placed halfway up the neckband, but remember to offset the buttonhole away from the outer edge of the neckband. This will ensure that the top button closes neatly without any gaping or pulling.
The bottom buttonhole should be placed at least an inch away from the bottom edge of the cardigan, otherwise it can look like the button is creeping off! It just doesn’t look balanced. In fact, if I’m working with a heavier yarn and larger buttons, I place my buttonholes up to 2 inches away from the bottom edge.
The remaining buttonholes should be spaced evenly between the top and the bottom buttonholes.
3 Knitted Buttonholes to Try
There are lots of different buttonholes out there, each for different purposes, however I’ve listed three here that you might want to try on your next cardigan design. Each of these buttonholes can be found in Montse Stanley’s Knitting Handbook.
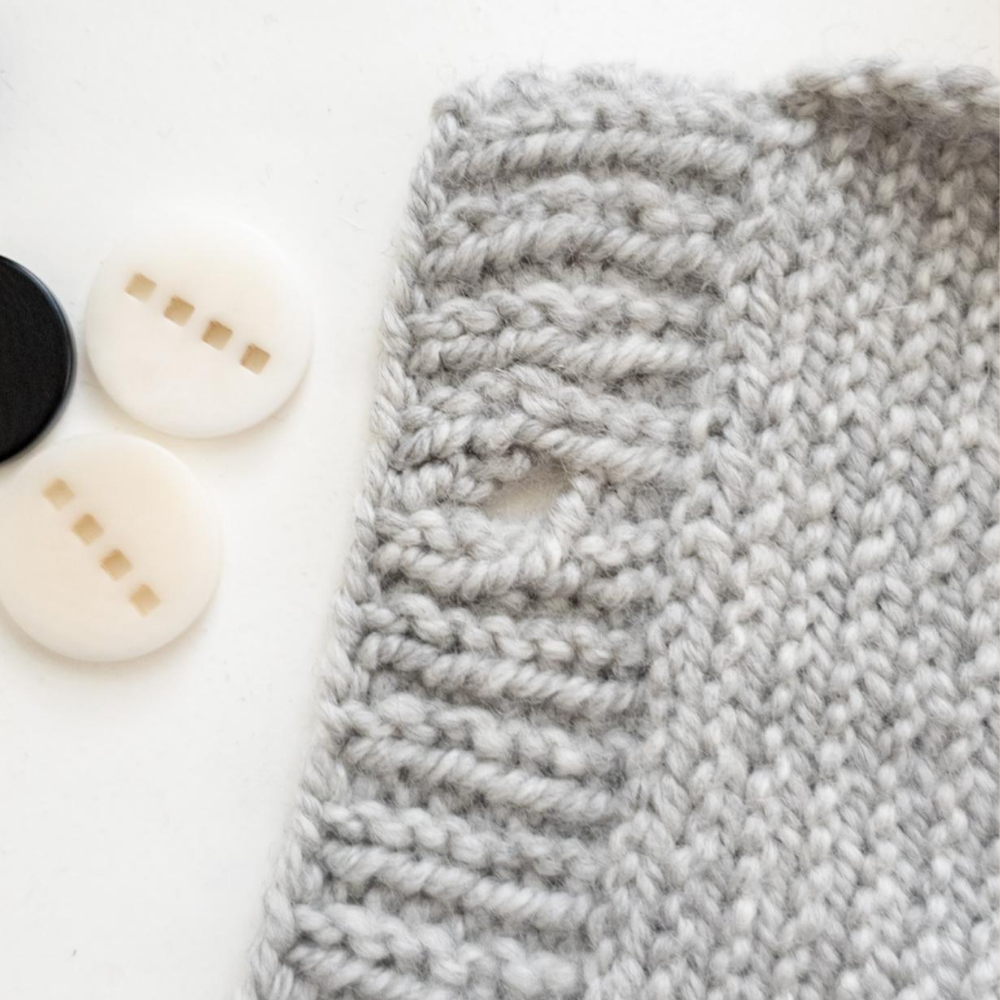
Large Eyelet Buttonhole
Large Eyelet Buttonhole
This is quite a small buttonhole, so it looks best when you’re working with DK yarn or smaller.
Work the buttonhole as follows:
Row 1 (RS): Dbl-YO, k2tog tbl
Row 2 (WS): P1, drop 1
Row 3: K1b

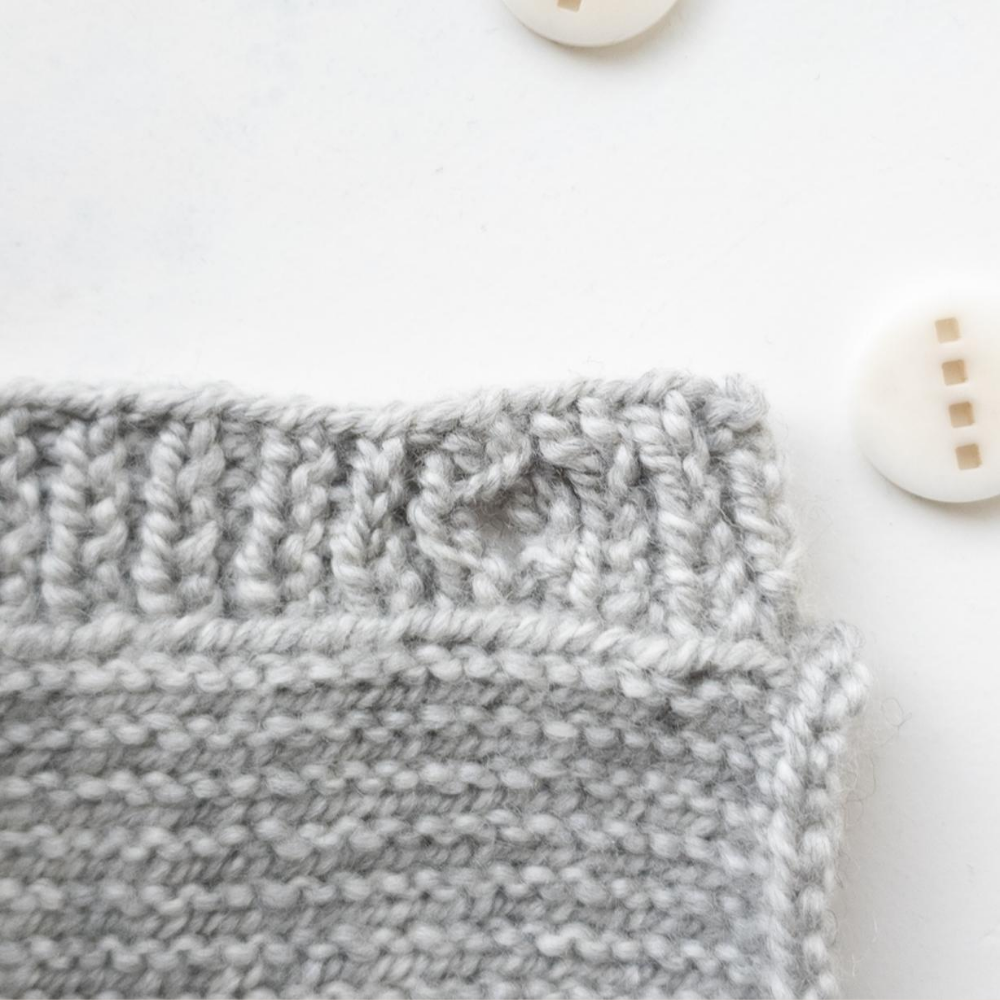
One-Row Buttonhole
One-Row Buttonhole
This is usually my buttonhole of choice because it always looks super neat and it doesn’t stretch out too much. You can also make it as big as your button requires. As the name suggests, this button is worked across one single row.
With yarn in front, sl1 pwise, then bring the yarn to the back. *Sl1 pwise, pass previous st over it; rep from * until you reach the end of the buttonhole. Slip the final bind-off stitch of the buttonhole back to the LH needle and turn. Using the Cable Cast-On, CO the same number of sts that you BO, then CO an extra stitch, but bring the yarn in front before placing the stitch on the LH needle and turn. Sl1 kwise, pass extra cast-on stitch over it.
Vertical Buttonhole
Vertical Buttonhole
You won’t need to use this very often, however it’s a good option when you’re knitting the button band into the body of the cardigan but you still want vertical buttonholes, not horizontal.
Like the one-row buttonhole, you can make it as large as you need.
It’s fussy, but quite simple to create. Just split and work each side of the buttonhole separately and then join them at the top of the buttonhole.
Use a nice selvedge (chain selvedge is Montse’s recommendation!) to create neat edges.
Share your buttonhole tips!
Do you have any buttonhole tips that you’d like to recommend to other designers? Share them in the comments section below! I always love hearing about other designers’ tricks.
FREE, On-Demand Workshop
You’ll learn how to go from inspiration to sketch to swatch, using the same method I teach inside my course (where hundreds of knitters have designed their first patterns).